
Preferences Dialog
To open the Preferences dialog, select Edit > Preferences.
In addition to the settings, the dialog provides the following options:
Preference Presets
Allows you to select a saved preference preset.
Store
Allows you to save the current preferences as a preset.
Rename
Allows you to rename a preset.
Delete
Allows you to delete a preset.
Store marked preferences only
Allows you to select which pages are included in the preset.
Defaults
Resets the options on the active page to their default settings.
Apply
Applies any changes that you have made without closing the dialog.
OK
Applies any changes that you have made and closes the dialog.
Cancel
Closes the dialog without saving any changes.
keywords:
1. How to search, in Cubase's All Setting + Preferences + Menu Tree?
2. Use the computer browser search function!
Press CTRL-key and hold, then F-key
3. Input a search word. Single or two words for best result.
Examples: Musical, Metering, Latency, Colorize, Auto monitoring, Scrub, Start position, Auto save wheel, Enable record

Editing
‘Edit Solo’/’Record in MIDI Editors’ Follow Focus
Suspends Record in Editor and Solo Editor in the MIDI editor if the Project window gets the focus.
Default Track Time Type
Allows you to select the default track time type for new tracks.
●Musical
Sets new tracks to musical time base.
●Time Linear
Sets new tracks to linear time base.
●Follow Transport Main Display
Sets new tracks to follow the primary time format: Bars+Beats format sets new tracks to musical time base. Seconds, Timecode, Samples, etc. sets new tracks to linear time base.
Display Warning before Deleting Non-Empty Tracks
Shows a warning if you delete tracks that are not empty.
Select Track on Background Click
Allows you to select a track by clicking in the event display background.
Auto Select Events under Cursor
Automatically selects all events in the Project window or in an editor that are under the project cursor.
Cycle Follows Range Selection
Sets the left locator to the range start position and the right locator to the range end position of a range selection.
Delete Overlaps
Deletes overlapped, that is, hidden, sections of overlapping events. Hold Shift while moving events to override this setting.
Parts Get Track Names
Automatically changes event names to the name of the track they are moved to.
Lock Event Attributes
Determines which properties are affected when you lock an event. You can use any combination of the following:
●Position
Locks the position so that the event cannot be moved.
●Size
Locks the size so that the event cannot be resized.
●Other
Locks all other editing of the event. This includes adjusting the fades and event volume, processing, etc.
Quick Zoom
Only redraws the contents of parts and events once you have stopped changing the zoom. This is useful if screen redraws are slow on your system.
Use Up/Down Navigation Commands for Selecting Tracks only
Uses the Up Arrow/Down Arrow keys for track selection, not for event/part selection.
Track Selection Follows Event Selection
Automatically selects the corresponding track if you select an event in the Project window.
Automation Follows Events
Lets automation events automatically follow when you move, duplicate, copy, or paste an event or part on the track. This facilitates setting up automation that is related to a specific event or part, instead of a specific position in the project.
Drag Delay
Allows you to set up a delay in ms that is used when you move events. This is useful to avoid accidentally moving events when you click on them in the Project window
keywords:

Editing - Audio
Treat Muted Audio Events like Deleted
Allows you to play the hidden event of 2 overlapping audio events when you mute the top event.
Use Mouse Wheel for Event Volume and Fades
Allows you to use the mouse wheel to move event volume and fades.
● Moving the mouse wheel moves the event volume curve up or down.
● Holding down Shift while moving the mouse wheel moves the fade curves.
● Positioning the mouse in the left half of the event moves the end point of the fade in.
● Positioning the mouse in the right half of the event moves the start point of the fade out.
On Import Audio Files
Determines what happens when you import an audio file.
● Open Options Dialog
Opens a dialog where you can select whether you want to copy the file to the audio folder and/or convert it to the project settings.
● Use Settings
Uses the default settings for importing audio.
Remove Regions/Hitpoints on all Offline Processes
Removes regions/hitpoints of audio ranges when you perform offline processing.
On Processing Shared Clips
Determines what happens when you apply processing to a shared clip that is used by more than one event in the project.
● Open Options Dialog
Opens the Options dialog that allows you to select whether you want to create a new version of the clip or apply the processing to the existing clip.
● Create New Version
Creates a new editing version of the clip, and applies the processing to that version leaving the original clip unaffected.
● Process Existing Clip
Applies the processing to the existing clip. All events playing that clip are affected.
Enable Automatic Hitpoint Detection
Enables the automatic hitpoint detection for imported or newly recorded audio files.
Time Stretch Tool Algorithm
Sets the default algorithm that is applied when you use the Object Selection tool in Sizing Applies Time Stretch mode.
Default Warping Algorithm
Sets the warp algorithm for new audio clips in the project.
keywords:

Editing - Chords
‘X’ Chords Mute Notes on Tracks That are in Follow Chord Track Mode
Mutes playback when you play back a track that follows the chord track and the cursor reaches an undefined chord event (X chord).
Disable ‘Acoustic Feedback’ during Playback
Disables Acoustic Feedback during playback. This ensures that chord events are not triggered twice.
Hide Muted Notes in Editors
Hides notes that get muted due to their MIDI track following the chord track.
keywords:

Editing - Controls
Value Box/Time Control Mode
Allows you to select your preferred way of controlling value fields.
● Text Input on Left-Click
Clicking opens a value box for editing.
● Increment/Decrement on Left/Right-Click
Clicking decreases the value, right-clicking increases the value. Double-clicking allows you to enter values manually.
● Increment/Decrement on Left-Click and Drag
Clicking and dragging up or down adjusts the value. Double-clicking allows you to enter values manually.
Knob Mode
Allows you to select your preferred way of controlling knobs.
● Circular
Clicking and dragging in a circular motion changes the setting. Clicking anywhere along the encoder’s edge immediately changes the setting.
● Relative Circular
Clicking anywhere on an encoder and dragging changes the current setting. There is no need to click on the exact current position.
● Linear
Clicking on an encoder and dragging up or down, or left or right changes the setting.
Slider Mode
Allows you to select your preferred way of controlling value sliders.
● Jump
Clicking anywhere on a slider instantly moves the slider handle to that
position.
● Touch
Clicking and dragging the actual slider handle adjusts the setting.
● Ramp
Clicking and dragging a slider causes the handle to move smoothly to the new position.
● Relative
Clicking and dragging up or down changes the setting according to how far you drag, not according to where you click.
keywords:

Editing - MIDI
Select Controllers in Note Range: Use Extended Note Context
Takes into account the extended note context when you move notes together with their controllers. This means that controllers between the last selected note and the following note or the end of the part are also moved.
Legato Overlap
Allows you to set an overlap for the Legato function. Legato allows you to extend MIDI notes so that they reach the next notes.
An overlap setting of 0 ticks causes each selected note to extend so that it reaches the next note exactly. A positive value causes the notes to overlap by the specified number of ticks. A negative value causes a slight gap between the notes.
Legato Mode: Between Selected Notes Only
Adjusts the length of selected notes so that they reach the next selected note.
Split MIDI Events
Splits MIDI events when you split a MIDI part in the Project window, and the split position intersects the MIDI events. This also creates new notes at the beginning of the second part.
Split MIDI Controllers
Splits MIDI controllers when you split a MIDI part in the Project window, and the part contains a controller. If the controller value at the split position is not zero, a new controller event of the same type and value is inserted at the split position at the start of the second part.
NOTE
If you just split a part and play back the result, it will sound the same regardless of this setting. However, if you split a part and delete the first half or move the second half to a different position in the project, you may want to activate Split MIDI Controllers to make sure all controllers have the correct value at the beginning of the second part.
keywords:

Editing - Project & MixConsole
Select Channel/Track on Solo
Selects channels/tracks when you click their Solo button.
Select Channel/Track on Edit Settings
Selects channels/tracks when you click their Edit Channel Settings button.
Scroll to Selected Track
Scrolls the track list when you select a MixConsole channel and the respective track is out of view.
Sync Selection in Project Window and MixConsole
Synchronizes the selection in the Project window and the MixConsole.
Enable Record on Selected MIDI Track
Record-enables MIDI tracks when you select them.
Enable Record on Selected Audio Track
Record-enables audio tracks when you select them.
Enable Solo on Selected Track
Solos tracks when you select them.
Deep Track Folding
Applies the Track Folding functions to all subelements of the tracks.
Enlarge Selected Track
Enlarges a track when you select it. If you select a different track, this track is enlarged, and the previously selected track is displayed in its original size.
keywords:

Editing -Tool Modifiers
On this page, you can specify which modifier keys are used for additional functionality when using tools.
PROCEDURE
1. Select an option in the Categories list.
2. Select the action for which you want to edit the modifier keys in the Action list.
3. On your computer keyboard, hold down the modifier keys and click Assign.
RESULT
The current modifier keys for the action are replaced. If this tool already has assigned modifiermodifier keys, you are prompted to replace them.
keywords:

Editing - Tools
Show Toolbox on Right Click
Opens a toolbox when you right-click in the event display and editors. To open the context menu instead of the toolbox, press any modifier key when right-clicking.
Cross-Hair Cursor
Allows you to set up the colors for the line and the mask of the cross-hair cursor, as well as its width.
Zoom Tool Standard Mode: Horizontal Zooming Only
Zooms the window horizontally without changing the track height when you zoom with the Zoom tool.
Select Tool: Show Extra Info
Displays the current pointer position and the name of the track and event at which you are pointing when you use the Object Selection tool in the Project window event display.
Show Notification when Switching Tool Mode with Key Command
Shows a notification when you switch the tool mode by using a key command.
keywords:

Editors
Use Drum Editor when Drum Map is assigned
Shows drum note symbols in parts on MIDI tracks to which drum maps are assigned. The parts automatically open in the
Default MIDI Editor
Determines which editor is opened when you double-click a MIDI part or when you select it and press Ctrl/Cmd-E. This setting is overwritten for tracks with drum maps if Use Drum Editor when Drum Map is assigned is activated.
Editor Content Follows Event Selection
Open editors show the events that are selected in the Project window.
Double-click opens Editor in a Window/in Lower Zone
Determines where an editor is opened when you double-click an audio event or a MIDI part, or when you use the key command assigned to Open/Close Editor.
Open Editor Commands open Editors in a Window/in Lower Zone
Determines where an editor is opened when you use an open command from the Audio or MIDI menu or the corresponding key commands.
keywords:

Event Display
The Event Display section contains several settings for customizing the display in the Project window.
Show Event Names
Shows the names on parts and events.
Hide Truncated Event Names
Hides event names if they are too long.
Show Overlaps
Determines how overlapping events are displayed.
Grid Overlay Intensity
Sets the overlay intensity of the displayed grid lines.
Event Handling Opacity
Sets the opacity of overlying events when you move them.
Event Opacity
Sets the opacity of the event background.
NOTE
● If you reduce the event opacity, it might be helpful to increase the Waveform Brightness for audio events or the Note Brightness for MIDI events.
●Reducing the opacity may result in a less responsive user interface.
Smallest Track Height to Show Data
Determines from which track height the track contents are displayed.
Smallest Track Height to Show Name
Determines from which track height the track names are displayed.
keywords:

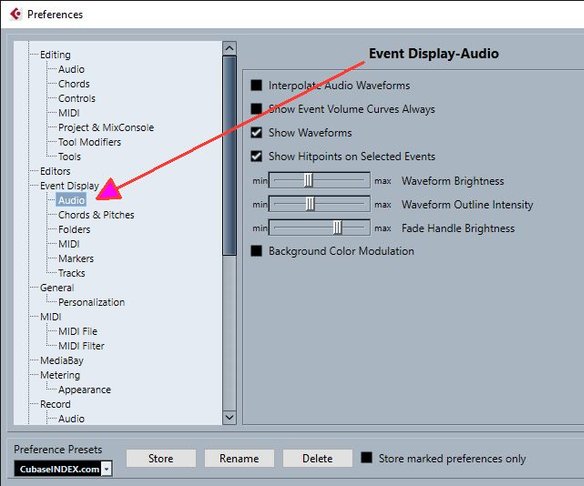
Event Display - Audio
Interpolate Audio Waveforms
Interpolates sample values to form curves when you zoom in to one sample per pixel or less.
Show Event Volume Curves Always
Shows event volume curves, regardless of whether the event is selected.
Show Waveforms
Shows waveforms for audio events.
Show Hitpoints on Selected Events
Shows hitpoints for selected audio events.
Waveform Brightness
Sets the brightness of the waveform.
Waveform Outline Intensity
Sets the intensity of the waveform outline.
Fade Handle Brightness
Sets the brightness of the fade lines for audio events.
Background Color Modulation
Reflects the waveform dynamics in the background of audio waveforms.
keywords:
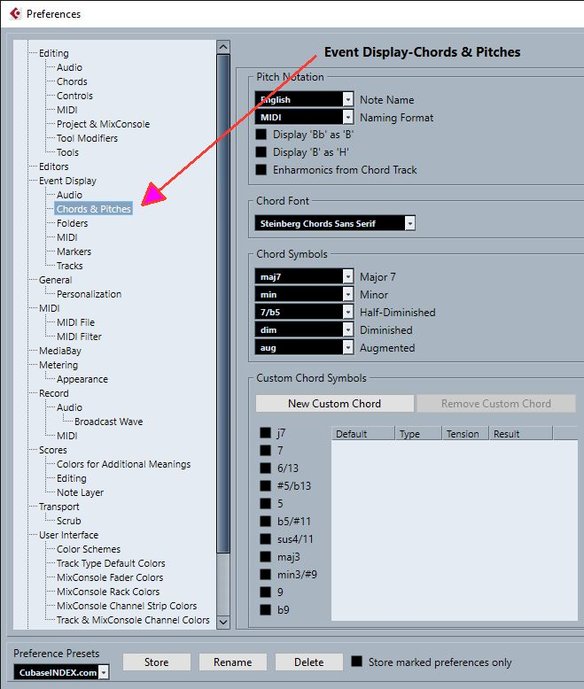
Event Display - Chords & Pitches
Pitch Notation
● Note Name
Allows you to select how chord symbols are displayed. You can choose English, German, or Solfège.
● Naming Format
Allows you to determine how MIDI note names are displayed in editors, etc.
● Display ‘Bb’ as ‘B’
Displays ‘B’ as a pitch name. This is only available if you selected English in the Note Name pop-up menu.
● Display ‘B’ as ‘H’
Displays ‘H’ as a pitch name. This is only available if you selected English in the Note Name pop-up menu.
● Enharmonics from Chord Track
Uses the chord events on the chord track to determine if enharmonically equivalent notes in the Key Editor and in the List Editor are displayed as sharp or flat.
Chord Font
Allows you to specify a font for all chord symbols.
Chord Symbols
Allows you to select your preferred display method for major 7th chords, minor chords, half-diminished chords, diminished chords, and augmented chords.
Custom Chord Symbols
Allows you to modify the default chord symbols that are used on the chord track, for the chord pads, and in the Score Editor.
● New Custom Chord allows you to add a new custom chord symbol.
● The options to the left allow you to specify the chord for which you want to change the chord symbol.
● Click the Type and Tension column and enter your custom symbol.
NOTE
You must define custom symbols for each set of tensions.
● The Result column shows how the chord will be displayed.
● The Remove Custom Chord button allows you to remove the custom chord symbol that is selected in the list.
EXAMPLE
To change the appearance of all minor chords from Xmin to X-, click New Custom Chord, activate 5 and min3/#
keywords:
Event Display - Folders
Show Event Details
Displays event details instead of data blocks.
This setting depends on the Show Data on Folder Tracks setting.
Show Data on Folder Tracks
Determines in which case data blocks or event details are displayed on folder tracks.
● Always Show Data
Displays data blocks or event details always.
● Never Show Data
Displays nothing.
● Hide Data When Expanded
Hides the display of events when you open folder tracks.
keywords:

Event Display - MIDI
Part Data Mode
Determines if and how events in MIDI parts are shown. This setting is overwritten for tracks with drum maps if Use Drum Editor when Drum Map is assigned is activated.
Show Controllers
Shows non-note events such as controllers, etc. in MIDI parts.
Note Brightness
Sets the brightness of note events.
Controller Brightness
Sets the brightness of controller events.
RELATED preference "Editors"
Use Drum Editor when Drum Map is assigned
keywords:

Event Display - Makers
Show Marker Lines
Allows you to specify if marker lines are shown on other tracks in the Project window.
● Off
Marker lines are only shown on marker tracks.
● From Active Marker Track
Marker lines of the active marker track are shown on other tracks in the Project window.
● From All Marker Tracks
Marker lines of all marker tracks are shown on other tracks in the Project window.
keywords:

Event Display - Tracks
Default Track Name Width
Sets the default name width for all track types.
keywords:

General
The General page contains general settings that affect the program user interface. Set these according to your preferred work methods.
Enable HiDPI (Windows only)
Enables the appropriate resolution to render Cubase GUI elements sharp and precise on high resolution displays with supported scaling factors of 100 %, 125 %, 150 %, 175 %, and 200 %.
NOTE
Other scaling factors, such as 133 %, are not supported.
NOTE
On macOS, you can disable HiDPI support in the Cubase application folder by invoking Get Info and checking Open in Low Resolution.
Usage Logger Options
If you activate this option, Cubase gathers usage
information and writes it in a log filefile that you can find in the following location:
● On Windows: “\Users\<user name> \AppData\Local \Steinberg\usagelogger”
On macOS: “/Users/<user name>/Library/Logs/Steinberg/usagelogger”
Activating this option to write such a file, and then sending the file to the Steinberg support team can be useful if Cubase crashes, and the crash dump files do not reveal enough information.
By default, Enable Usage Logging is deactivated. We recommend that you deactivate it when you no longer need it.
Language
Allows you to select which language is used in the program. After switching the language, you must restart the program for the change to take effect.
Auto Save
Automatically saves backup copies of all open projects with unsaved changes. These are named Name.bak, where name is the name of the project, and are saved in the project folder. Backup copies of unsaved projects are named #UntitledX.bak, where X is an incremental number, to allow multiple backup copies in the same project folder.
Auto Save Interval
Allows you to specify how often a backup copy is created.
Maximum Backup Files
Allows you to specify how many backup files are created. When the
maximum number of backup files is reached, the existing files is overwritten starting with the oldest file.
Show Tips
Displays an explanatory tooltip when you position the mouse pointer over an icon or button in Cubase.
Maximum Undo Steps
Allows you to specify the number of undo steps.
Run Setup on Create New Project
Opens the Project Setup dialog every time you create a new project.
Open Projects in Last Used View
Allows you to determine what window layout is used when you open a project.
● Never
Uses the original window layout and settings.
● Only External Projects
Projects that have been created on a different computer use the view that you last used on your computer. Projects that have been created on this computer use the original window layout and settings.
● Always
Uses the view that you last used on your computer.
Use Hub
Opens the Hub when you start Cubase or create a new project using the File menu.
keywords:

General - Personalization
Default Author Name
Allows you to specify an author name that is used by default for new projects. This is included as metadata when exporting audio files with an iXML chunk.
Default Company Name
Allows you to specify a company name that is used by default for new projects.
keywords:

MIDI
This page contains settings that affect MIDI recording and playback.
MIDI Thru Active
Sets all MIDI tracks that are record-enabled or have monitoring activated to echo incoming MIDI data, sending it back out on their respective MIDI outputs and channels. This allows you to hear the correct sound from your MIDI instrument during recording.
NOTE
If you use MIDI Thru, select Local Off mode on your MIDI instrument to prevent each note from sounding twice.
Reset on Stop
Sets Cubase to send out MIDI reset messages, including note-off and controller resets, on stop.
Never Reset Chased Controllers
Never resets controllers to 0 when you stop playback or move to a new position in the project.
Length Adjustment
Allows you to enter a length adjustment value in ticks by which the notes that have the same pitch and MIDI channel are adjusted. This ensures that there is always a short time between the end of one note and the start of another. By default, there are 120 ticks per 1/16 note, but you can adjust this with the MIDI Display Resolution setting.
Chase Events
Chases event types for which one of the chase options is activated when you locate to a new position and start playback. This makes your MIDI instruments sound as they should when you locate to a new position and start playback.
If Chase not limited to Part Boundaries is activated, MIDI controllers are also chased outside the part boundaries, and the chase is performed on the part under the cursor as well as on all the parts to the left of it. Deactivate this for very large projects, as it slows down processes such as positioning and soloing.
MIDI Display Resolution
Allows you to set the display resolution for viewing and editing MIDI data.
Extend Playback Range of Notes that start before the Part
Extends the playback range of MIDI notes that start before the part in ticks. This is useful if MIDI events start shortly before the start of the MIDI part. If you do not extend the playback range, these events are not played. This setting is also taken into account during cycle playback.
Insert Reset Events after Record
Inserts a reset event at the end of each recorded part. This resets controller data, such as Sustain, Aftertouch, Pitchbend, Modulation, or Breath Control. This is useful if you stop recording before the note off command is sent, for example.
Audition through MIDI Inserts/Sends
Activates the layering of MIDI instruments (by MIDI sends) also within the MIDI editors. This way, the acoustic feedback of the editors sends the MIDI data not only to the output selected for the track, but additionally through any MIDI inserts and MIDI sends assigned to it. However, this also means that MIDI events will be sent through any MIDI plug-ins assigned to this track.
MIDI Latency Mode
Allows you to specify the latency of the MIDI playback engine.
Low lowers the latency and increases the responsiveness of the MIDI playback engine. However, this setting might also decrease your computer performance if your project contains lots of MIDI data.
Normal is the default mode and the recommended setting for most workflows.
High increases the latency and the playback buffer. Use this if you work with complex VST instrument libraries or with projects that have a very high performance level.
MIDI Max. Feedback in ms
Allows you to set the maximum length of the notes when using Acoustic Feedback in MIDI editors.
keywords:

MIDI-File Export Opt.
These options allow you to specify what data is included in exported MIDI files.
Export Inspector Patch
Includes MIDI patch settings in the Inspector as MIDI bank select and program change events in the MIDI file.
Export Inspector Volume/Pan
Includes volume and pan settings in the Inspector as MIDI volume and pan events in the MIDI file.
Export Automation
Includes automation as MIDI controller events in the MIDI file. This also includes automation recorded with the MIDI Control plug-in.
If you record a continuous controller (CC7, for example) and deactivate Read Automation for the automation track, only the part data for this controller is exported.
Export Inserts
Includes MIDI modifiers and MIDI inserts in the MIDI file.
Export Sends
Includes MIDI sends in the MIDI file.
Export Markers
Includes markers as standard MIDI file marker events in the MIDI file.
Export as Type 0
Exports a type 0 MIDI file with all data on a single track, but on different MIDI channels. If you deactivate this option, a type 1 MIDI file with data on separate tracks is exported.
Export Resolution
Allows you to set a MIDI resolution between 24 and 960 for the MIDI file. The resolution is the number of pulses, or ticks, per quarter note (PPQ) and determines the precision with which you will be able to view and edit the MIDI data. The higher the resolution, the higher the precision. The resolution should be chosen depending on the application or sequencer with which the MIDI file will be used, because certain applications and sequencers may not be able to handle certain resolutions.
Export Locator Range
Exports only the range between the left and right locator.
Export includes Delay
Includes delay settings you have made in the Inspector in the MIDI file.
keywords:


MediaBay
Maximum Items in Results List
Sets the maximum number of files that are displayed in the Results list.
Allow Editing in Results List
Enables editing of attributes in the Results list.
Show File Extensions in Results List
Displays file name extensions in the Results list.
Scan Folders Only When MediaBay Is Open
Scans for media files when the MediaBay window is open.
NOTE
During playback or recording no folder scans are performed.
Scan Unknown File Types
Scans all file types.
keywords:

Metering
Map Input Bus Metering to Audio Track (in Direct Monitoring)
Maps the input bus metering to monitor-enabled audio tracks, giving you the opportunity to watch the input levels of your audio tracks when working in the Project window.
For this to work, activate Direct Monitoring in the Studio Setup dialog.
NOTE that the tracks are mirroring the input bus signal, that is, you will see the same signal in both places. When using mapped metering, any functions, such as trimming, that you apply to the audio track are not reflected in its meters.
Meters’ Peak Hold Time
Allows you to specify for how long the peak levels are held in the meters. For this to work, deactivate Meters - Hold Forever in the MixConsole.
Meters’ Fallback
Allows you to specify how quickly the meters in the MixConsole return to lower values after signal peaks.
keywords:

Metering - Apperance
This page allows you to assign colors to level meter values to quickly identify what levels are reached. You can edit the appearance individually for all available scales.
Add
Adds a color handle to the top of the meter.
Remove
Removes the selected color handle.
Scale
Allows you to select a scale for editing.
NOTE
The +3 dB Digital scale is used for the channel meters.
keywords:

Record
This page contains settings related to audio and MIDI recording.
Deactivate Punch In on Stop
Deactivates Punch In on the Transport panel whenever you enter stop mode.
Stop after Automatic Punch Out
Stops playback after automatic Punch Out. If the post-roll value on the Transport panel is set to a value other than zero, playback will continue for the set time before stopping.
keywords:

Record - Audio
Audio Pre-Record Seconds
Sets for how many seconds any incoming audio you play is captured in buffer memory during playback or in stop mode.
When Recording Wave Files Larger than 4 GB
Determines what happens if you record wave files that are larger than 4 GB.
● To split the wave file, select Split Files.
Use this if you work on a FAT32 file system that supports only file sizes up to 4 GB.
● To save the wave file as an RF64 file, select Use RF64 Format.
RF64 files use the .wav extension. However, they can only be opened with an application that supports the RF64 standard.
Create Audio Images during Record
Creates and displays a waveform image during the recording process.
NOTE
This real-time calculation uses some extra processing power.
keywords:

Record - Audio - Broadcast Wave
Record - Audio - Broadcast Wave
This page allows you to specify the Description, Author, and Reference Value text strings that are embedded in recorded Broadcast Wave files. The settings you make here also appear as default strings in the Broadcast Wave Chunk dialog when you export files to certain formats. Not only Broadcast Wave files can contain embedded information, but also Wave, and AIFF files.
keywords:

Record - MIDI
Record-Enable allows MIDI Thru
Prevents record-enabled MIDI or instrument tracks from echoing incoming MIDI data. This way record-enabled tracks to which a VST instrument is assigned do not play doubled notes.
Snap MIDI Parts to Bars
Lengthens recorded MIDI parts so that they start and end at whole bar positions. If you are working in a context that is based on bars and beats, this can make editing, such as moving, duplicating, and repeating, easier.
MIDI Record Catch Range in ms
Ensures that the very start of a recording that starts at the left locator is included.
Retrospective Record Buffer Size
You can capture MIDI data that you played in Stop mode or during playback and turn them into a MIDI part. Retrospective Record Buffer Size determines how much MIDI data can be captured in the buffer.
NOTE
To recover MIDI notes. Notes was playing during Stop or Play mode. See at the end of this page! "Retrospective MIDI notes recovery"
ASIO Latency Compensation Active by Default
Determines the initial state of the ASIO Latency Compensation button in the track list for MIDI or instrument tracks.
If you record live on a VST instrument, you usually compensate the latency of your audio card by playing too early. In consequence, the timestamps are recorded too early. By activating this option, all recorded events are moved by the current latency, and playback sounds like during the recording situation.
Add Latency to MIDI-Thru Processing
If you set the audio buffer size to a high value, and you play an arpeggiator in real time, for example, the MIDI notes are output with an increased latency.
If you consequently adapt your playing to the output latency, the notes are recorded even later. To minimize this effect, you can activate Add Latency to MIDI-Thru Processing. This adds a regular latency to each note that is played in real time.
Replace Recording in Editors
Affects the result of recording in a MIDI editor when Replace mode is selected as a record mode:
● None
Nothing is replaced.
● Controller
Only controller data is replaced, not notes.
● All
Replace mode works as usual. Notes and controllers are replaced when recording.
keywords:

Scores
This page allows you to make settings for the Score Editor. Select one of the available entries.
keywords:
Scores - Colors for Additional Meanings
Allows you to specify different colors to identify non-standard elements in the score.
● Click in the Active column to activate this function for the respective element.
● Click in the color field to the right to specify a color.
keywords:

Scores - Editing
Insert Tool
Display Object Selection Tool after Inserting Symbol
Switches back to the Object Selection tool after you add a symbol.
Double-Click Symbol to Get Draw Tool
Activates the Draw tool in a palette when you double-click with the Object Selection tool.
Selections
Tied Notes Selected as Single Units
Selects both notes when you click on either note in a tied note pair.
Note Tool
Show Bars and Beats Positions When Inserting Notes
Shows the bars and beats positions when you insert notes with the mouse or the computer keyboard.
Show Pitch When Inserting Notes
Indicates the pitch when inserting notes.
Use Mouse Wheel to Transpose Notes
Allows you to transpose selected notes with the mouse wheel.
Show Note Info by the Mouse
Shows a tooltip pitch and position information when inserting or dragging a note in the score.
Layout Tool
Global Staff Spacings with Alt/Opt-Ctrl/Cmd
Applies the spacing to all staves on the current and all the following pages when you press Alt/Opt-Ctrl/Cmd and adjust the spacing of staves.
Show Braces in Edit Mode
Shows braces also in Edit Mode, not only in Page Mode.
Unlock Layout When Editing Single Parts
If there is more than one part on a track, and you open the Score Editor for one of these parts, the other parts are displayed as empty space to preserve the layout. If this option is activated, this empty space is avoided, so you can print this single part without endless rests.
NOTE
This option erases the layout for the whole track. The next time you open the entire track, the previous layout is overwritten with the layout settings you made for the single edited part.
Double-Click on Staff Flips between Full Score/Part
Switches between display of either the whole track or the current part when you double-click on a staff.
NOTE
In this case, the Score Settings dialog only opens if you select Scores > Settings.
Miscellaneous
Show Position Cursor
Shows the project cursor as a vertical line in the score. You can click and drag the line to move the cursor or hold down Ctrl/Cmd and click anywhere in the score to move the cursor directly there.
“Apply” closes Property Windows
Closes property windows and non-modal dialogs when you click Apply.
Hide Notes beyond Limits
Hides notes outside the Note Limits range set in the Score Settings dialog (Staff page - Options tab).
Default Number of Bars per Staff
This is used in 2 cases:
● In Edit Mode this sets how many bars are shown across the page.
● In Page Mode this sets how many bars are shown across the page in a new layout.
NOTE
When using the Auto Layout function, you will
keywords:

Scores - Note Layer
When you are moving and editing notes, you might accidentally move other objects nearby. To avoid this, you can assign different types of objects to different note layers (up to 3) and instruct Cubase to lock one or 2 of these layers, making them unmovable.
This page is where you specify to which layer each object type belongs. The actual locking of layers is done on the extended toolbar of the Score Editor.
keywords:

Transport
This page contains options related to playback, recording, and positioning.
Playback Toggle Triggers Local Preview
Allows you to use Space on your keyboard to start/stop local playback of the selected file in the Sample Editor or the Pool.
When the Sample Editor is not open or when there is no audio file selected in the Pool, Space still toggles the global project playback.
Show Timecode Subframes
Shows subframes for all frame-based display formats.
User-definable Frame Rate
Allows you to set the frame rate for the ruler display format User.
Return to Start Position on Stop
Automatically sets the project cursor to the position where recording or playback last started when you stop playback.
Stop Playback while Winding
Stops playback when you click Rewind or Fast Forward on the Transport panel.
Wind Speed Options
These options affect the fast forward/rewind speed.
● Adjust to Zoom
adapts the wind speed to the horizontal zoom factor.
If you zoom in very close for detailed editing, you probably do not want to have a high fast forward/rewind speed. Because of this, the Speed Factor does not have any effect in this mode. The Fast Wind Factor still applies.
● Fixed
keeps a fixed wind speed regardless of the horizontal zoom factor.
● Speed Factor
allows you to set the wind speed. You can set a value between 2 and 50. The higher the value, the faster the wind speed will be.
If Adjust to Zoom is activated, this has no effect.
● Fast Wind Factor
allows you to set the winding speed to a multiple for fast winding.
If you press Shift while fast forwarding or rewinding, the wind speed will increase. The increase in speed is a multiple of the Speed Factor. Meaning that if you set the Fast Wind Factor to 2, the wind speed will be twice as fast. If you set it to 4, the wind speed will be 4 times as fast, etc. You can set a value between 2 and 50.
Cursor Width
Adjusts the width of the project cursor line.
Zoom while Locating in Time Scale
Allows you to zoom in or out by clicking in the ruler and dragging down or up.
Clicking Locator Range in Upper Part of the Ruler Activates Cycle
Allows you to activate/deactivate cycle mode when you click the locator range in the upper part of the ruler.
Locate when Clicked in Empty Space
Allows you to move the project cursor by clicking in an empty area of the Project window.
keywords:

Transport - Scrub
Scrub Volume
Sets the playback volume for the Scrub tool in the Project window and audio editors.
NOTE
This does not affect the scrub volume controlled by any connected hardware.
Use High Quality Scrub Mode
Enables effects for scrubbing and uses a higher resampling quality. However, scrubbing will be more demanding on the processor.
Use Inserts While Scrubbing
Allows you to activate insert effects for
keywords:

User Interface
This page contains options that allow you to adjust the default user interface colors.
Color Schemes
Allows you to adjust the color scheme for the application and the desktop cover.
● Click one of the colors in the Choose Color Scheme section to apply a pre-defined definedpre-defined color.
● Click the field in the Choose Custom Color section to open the Color Picker and select a custom color.
Track & MixConsole Channel Colors
Allows you to set the Auto Track/Channel Color Mode, to colorize track controls and MixConsole channel controls, and to determine the brightness of selected channels.
Track Type Default Colors
Allows you to set the colors for the different track types.
MixConsole Fader Colors
Allows you to set the colors for the level faders of the channel types in the MixConsole.
MixConsole Rack Colors
Allows you to set the colors for the racks in the MixConsole.
MixConsole Channel Strip Colors
Allows you to set the colors for the channel strips in the MixConsole.
keywords: UI, DAW color, colour, change color,
colouring


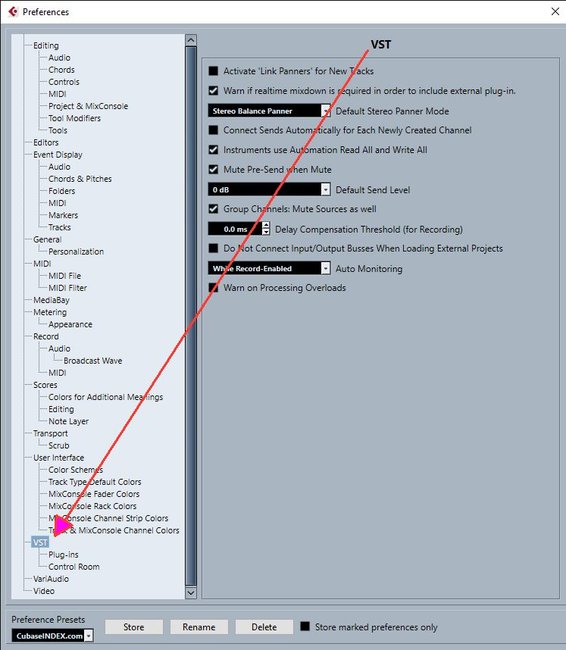
VST
This page contains settings for the VST audio engine.
Activate ‘Link Panners’ for New Tracks
Activates Link Panners by default for new tracks so that the channel sends section always mirrors the pan settings made in the channel fader section.
Warn if realtime mixdown is required in order to include external plug-in
Shows a warning if a realtime mixdown is required.
Default Stereo Panner Mode
Allows you to specify the default pan mode for inserted audio tracks.
Connect Sends Automatically for Each Newly Created Channel
Automatically connects the send routing for existing FX channels when you create a new audio or group channel.
Instruments use Automation Read All and Write All
If you activate this, the Read and Write automation status in control panels for VST instruments is affected by Activate/Deactivate Read for All Tracks and Activate/Deactivate Write for All Tracks.
Mute Pre-Send when Mute
Mutes pre-fader sends when you mute their channels.
Default Send Level
Allows you to specify a default level for your send effects.
Group Channels: Mute Sources as well
Mutes channels that are directly routed to a group channel when you mute the group channel. Channels that were muted prior to the group channel being muted will not remember their mute status and will be unmuted when the group channel is unmuted.
NOTE
This does not affect how mute automation is written.
Delay Compensation Threshold (for Recording)
Minimizes the latency effects of the delay compensation while maintaining the sound of the mix as far as possible. Only plug-ins with a delay higher than this threshold setting are affected by the Constrain Delay Compensation function. By default, this is set to 0.0 ms, which means that all plug-ins will be affected. If you feel that a little latency is acceptable, you can raise this threshold value.
NOTE
Cubase features full delay compensation–any delay inherent in the VST plug-ins you use will automatically be compensated for during playback. However, when you play a VST instrument in real time or record live audio (with monitoring through Cubase activated), this delay compensation may result in added latency.
Do Not Connect Input/Output Busses When Loading External Projects
Prevents connecting input and output busses to the ASIO ports of your system when loading external projects.
Auto Monitoring
Determines how Cubase handles monitoring. The following options are available:
● Manual
Turns input monitoring on or off when you click Monitor.
● While Record-Enabled
Connects the audio source to the channel input when you click Record Enable.
● While Record Running
Switches to input monitoring only during recording.
● Tapemachine Style
Activates input monitoring in stop mode and during recording, but not during playback.
NOTE
The automatic monitoring options apply when you monitor through Cubase, or when you use ASIO Direct Monitoring. If you monitor externally (listen to the input signal from an external mixer, for example), select Manual mode and keep all audio Monitor buttons turned off in Cubase.
Warn on Processing Overloads
Shows a warning if the CPU overload indicator on the Transport panel lights up during recording
keywords: tape machine
VST - Plug-ins
Warn before Removing Modified Effects
Shows a warning if you remove an effect plug-in for which you have made parameter changes.
Open Effect Editor after Loading It
Opens the effect control panel when you load VST effects or VST instruments.
Create MIDI Track when Loading VSTi
Allows you to determine if a MIDI track is created when you add a rack instrument.
● Always
A MIDI track is always created.
● Do not
No MIDI track is created.
● Always ask to
You are asked whether a corresponding MIDI track should be created.
Synchronize Plug-in Program Selection to Track Selection
Synchronizes track and plug-in program selection if you route multiple MIDI tracks to multitimbral instruments.
Suspend VST 3 plug-in processing when no audio signals are received
Suspends VST plug-in processing in passages where no audio is passing through the plug-in. This can improve system performance noticeably.
NOTE
We recommend to leave this option deactivated.
Plug-in Editors “Always on Top”
Always shows the control panels for effect plug-ins and VST instruments on top of other windows.
keywords:

VST -
Control Room
This page contains settings for the Control Room.
Show Control Room Volume in Transport Panel
If the Control Room is enabled, the Control Room volume is shown on the Transport panel.
Auto Disable Talkback Mode
Determines if talkback is disabled during recording, during playback and recording, or not at all.
NOTE
Set the Talkback DIM level to 0 dB so as not to radically change the mix level when punching in and out of record mode.
Use Phones Channel as Preview Channel
Uses the phones channel for monitoring.
Dim Cue during Talkback
Dims the cue mix heard in a studio by the amount set in the Talkback Dim level field in the Control Room for as long as the talkback channel is used.
Exclusive Device Ports for Monitor Channels
Makes the port assignment for monitor channels exclusive. If your scenario does not require you to assign ports to several monitor channels, it is recommended to activate this option. This way you can make sure that you do not accidentally assign ports to inputs/outputs and monitor channels at the same time.
NOTE
This setting is saved with the Control Room presets.
Reference Level
Allows you to specify the reference level that can be assigned to the Control Room level. The reference level is the level that is used in calibrated mixing environments, such as film dubbing stages.
NOTE
You can also manually adjust the reference level in the Control Room settings.
Main Dim Volume
Sets the amount of gain reduction applied to the Control Room channel when the DIM button is activated.
keywords:

VariAudio
Inhibit warning when changing the Sample Data
Inhibits the message that warns you when you modify audio material that is used in several places in the project.
Inhibit warning when applying Offline Processes
Inhibits the message that warns you when you apply offline processes
material that is used in several places in the project.
keywords:

Video
Extract Audio on Import Video File
Extracts and saves the audio data of imported video files as a separate audio clip.
Thumbnail Memory Cache Size
Allows you to set the size of the thumbnail cache.
keywords:

Important "Setup Dialog" is not a Preferences.
You find Setup Dialog at: Menu - Project - Project Setup
Project Setup Dialog
Important "Setup Dialog" is not a Preferences.
You find in "Setup Dialog" screen at:
Menu - Project - Project Setup
The Project Setup dialog allows you to make general settings for your project.
● To open the Project Setup dialog, select Project > Project Setup.
● To open the Project Setup dialog automatically when you create a new project, activate the Run Setup on Create New Project option in the Preferences dialog (General page).
IMORTANT:
While most Project Setup settings can be changed at any time, you must set the sample rate directly after creating a new project. If you change the sample rate at a later stage, you must convert all audio files in the project to the new sample rate to make them play back properly.
In the Project Duration section, the following options are available:
Project Start Time
Allows you to specify the start time of the project in timecode format. This also determines the sync start position when synchronizing to external devices.
Project Length
Allows you to specify the length of the project.
Project Frame Rate
In the Project Frame Rate section, the following options are available:
Project Frame Rate
Allows you to specify the timecode standard and frame rate for the project. When synchronizing to an external device, this setting must correspond to the frame rate of any incoming timecode.
Get Frame Rate From Video
Allows you to set the project frame rate to the frame rate of an imported video file.
Project Time Displays
In the Project Time Displays section, the following options are available:
Display Format
Allows you to specify the global display format that is used for all rulers and position displays in the program, except the ruler tracks. However, you can make independent display format selections for the individual rulers and displays.
Display Time Offset
Allows you to specify an offset for the time positions that are displayed in the rulers and position displays to compensate for the Project Start Time setting.
Display Bar Offset
This setting is only used if you select the Bars+Beats display format. Allows you to specify an offset for the time positions that are displayed in the rulers and position displays to compensate for the Project Start Time setting.
Record File Format
In the Record File Format section, the following options are available:
Sample Rate
Allows you to specify the sample rate at which Cubase records and plays back audio.
● If your audio hardware generates the sample rate internally and you select a non-supported sample rate, this is indicated by a different color. In this case, you must set a different sample rate to make your audio files play back properly.
● If you select a sample rate that your audio hardware supports, but that differs from its current sample rate setting, it is automatically changed to the project sample rate.
● If your audio hardware is externally clocked and
keywords:
Important "Setup Dialog" is not a Preferences.
You find in "Setup Dialog" screen at:
Menu - Project - Project Setup

Bit Depth
Allows you to specify the bit depth of the audio files that you record in Cubase. Select the record format according to the bit depth that is delivered by your audio hardware. The available options are 16 bit, 24 bit, 32 bit, 32 bit float, and 64 bit float.
NOTE
● If your audio interface supports a bit depth of 32 bit, and you want to maintain this precision in your recordings, you must select a Processing Precision of 64 bit floatfloat in the Studio Setup dialog.
● When you record with effects, consider setting the bit depth to 32 bit float or 64 bit float. This prevents clipping (digital distortion) in the recorded files and keeps the audio quality very high. Effect processing and level or EQ changes in the input channel are done in 32-bit float or 64-bit float format, depending on the Processing Precision setting in the Studio Setup dialog. If you record at 16 bit or 24 bit, the audio will be converted to this lower bit depth when it is written to a file. As a result, the signal may degrade. This is independent of the actual bit depth of your audio hardware. Even if the signal from the audio hardware has a bit depth of 16 bit, the signal will be 32 bit float or 64 bit float after the effects are added to the input channel.
● The higher the bit depth value, the larger the files and the more strain is put on the
Record File Type
Allows you to specify the file type of the audio files that you record in Cubase.
NOTE
● For wave file recordings larger than 4 GB, the EBU RIFF standard is used. If a FAT 32 disk is used (not recommended), audio files are split automatically. In the Preferences dialog, you can specify what happens if your recorded Wave file is larger than 4 GB.
● You can set up embedded strings in the Preferences dialog.
Project Ownership
In the Project Ownership section, the following options are available:
Author
Allows you to specify a project author that is written into the file, when you export audio files and activate the Insert iXML chunk option. You can specify a default author in the Default Author Name field in the Preferences dialog (General—Personalization page).
Company
Allows you to specify a company name that is written into the file, when you export audio files and activate the Insert iXML chunk option. You can specify a default company in the Default Company Name field in the Preferences dialog (General—Personalization page).
Other Project Settings
In the Other Project Settings section, the following options are available:
Stereo Pan Law
If you pan a channel left or right, the sum of the left and right side is higher (louder), than if this channel is panned center. These modes allow you to attenuate signals panned center. 0 dB turns off constant-power panning. Equal Power means that the power of the signal remains the same regardless of the pan setting.
Volume Max
Allows you to specify the maximum fader level. By default, this is set to +12 dB. If you load projects that were created with Cubase versions older than 5.5, this value is set to the old default value of +6 dB.
Hermode Tuning
In the Hermode Tuning section, the following options are available:
HMT Type (MIDI only)
Allows you to specify a mode for Hermode tuning of MIDI notes.
HMT Depth (MIDI only)
Allows you to specify the overall degree of retuning.
Project Location
In the Project Location section, the following options are available:
Project Location information
Displays the project location.
Show in Explorer/Reveal in Finder
Opens a file dialog that shows the location of the project file.
Important "MIDI Record Modes Dialog" is not a Preferences.
● To access the record modes, select Transport > MIDI Record Mode.
You can also access the MIDI Record Modes by clicking to the right of the MIDI symbol in the MIDI Recording Modes section on the Transport panel.
MIDI Record Modes Setup Dialog
Important "MIDI Record Modes Setup Dialog" is not a Preferences.
If you not see the MIDI icon?
Go to the right side of the page and click on the small cogwheel and enable MIDI record Setup Dialog.
● To access the record modes, select Transport > MIDI Record Mode.
You can also access the MIDI Record Modes by clicking to the right of the MIDI symbol in the MIDI Recording Modes section on the Transport panel.
By selecting a MIDI Record Mode you decide what happens to any existing parts on the track where you are recording. MIDI tracks can play back all events in overlapping parts. If you record several parts in the same locations or move parts so that they overlap, you will hear the events in all parts.
NOTE
If you activate Record in Editor to record MIDI data in the editor, all new recordings are merged into the active part, and the MIDI Record Modes do not apply.
MIDI Record Mode
New Parts
Existing parts that are overlapped by a new recording are kept. The new recording is saved as a new part.
Merge
Existing events in parts that are overlapped by a new recording are kept. The newly recorded events are added to the existing part.
Replace
Existing events in parts that are overlapped by a new recording are replaced.
MIDI Cycle Record Mode
When you record MIDI in cycle mode, the result not only depends on the MIDI record mode, but also on the cycle record mode that is selected in the Cycled MIDI Recording Only section.
Mix
For each completed lap, everything you record is added to what was previously recorded. This is useful for building up rhythm patterns. Record a hi-hat part on the first lap, the bass drum part on the second lap, etc.
Overwrite
As soon as you play a MIDI note or send any MIDI message, all MIDI that you have recorded on previous laps is overwritten from that point. Make sure that you stop playing before the next lap begins. Otherwise, you will overwrite the entire take.
Keep Last
Each completed lap replaces the previously recorded lap. If you deactivate recording or press Stop before the cursor reaches the right locator, the previous take will be kept. If you do not play or input any MIDI during a lap, nothing happens, and the previous take will be kept.
Stacked
Each recorded cycle lap is turned into a separate MIDI part, and the track is divided into lanes, one for each cycle lap. The parts are stacked above each other, each on a different lane. All takes but the last one are muted.
Mix-Stacked (No Mute)
Same as Stacked, but parts are not muted.
Automatic MIDI Record Quantize
Cubase can automatically quantize MIDI notes on recording.
●Automatic MIDI Record Quantize is available in the MIDI Auto Quantize section of the Transport Bar.
If you activate Auto Quantize, the notes that you record are automatically quantized according to the quantize settings.
keywords: MIDI overwrite, MIDI recording, MIDI setup,

Important
Retrocpecitve Recording recovery is not a preference
Recovery of MIDI notes is not a preference it's found in the "Inspector"
Recovery of MIDI Recordings
It's not a preference it's the in"Inspector"
Cubase allows you to recover MIDI data, including controller data, that was captured in Stop mode or during playback.
There are 3 alternative a, b or c to recover MIDI. See tbelow the picture.
If the "Retrocpecitve Recording" is grayed there is no MIDI data in the buffer.
Note. The Retrospecitve buffer is loaded with MIDI only when play MIDI notes in Stop or Play mode, not in recording mode.
The MIDI data is stored in the retrospective record buffer, and you can insert it as a MIDI part on the selected MIDI track.
The buffer captures up to 10000 MIDI events. This can correspond to a MIDI recording of around 2 minutes and 30 seconds. However, if you use a keyboard that produces a large amount of MIDI controller events, such as the ROLI Seaboard, this only corresponds to a recording of around 20 seconds.
NOTE
In the Preferences dialog (Record—MIDI page), you can specify a Retrospective Record Buffer Size.
If the buffer is full, the MIDI events that were captured first are replaced by the new events. MIDI events in the buffer are also replaced in the following situations:
● When you have inserted the retrospective recording on a track and you play new events in Stop mode or during playback.
●When you play MIDI notes in Stop mode and you do not play for more than 30 seconds, before playing more MIDI events in Stop mode.
NOTE
You can also empty the buffer manually.
keywords: MIDI recovery, recovery MIDI, restore midi notes, recovery midi notes,
Emptying the Retrospective Record Buffer
You can empty the retrospective record buffer manually.
PROCEDURE
● Do one of the following:
● In the top section of the MIDI track Inspector, open the Retrospective Recording pop-up menu, and select Empty Retrospective Record Buffer.
●Select a track, and select Transport > MIDI Retrospective Recording > Empty All Buffers.
Remaining Record Time
The Max. Record Time display lets you see how much time you have left for recording.
The available time depends on the current setup, for example, on the amount of tracks that are record-enabled, the sample rate for your project, and the available hard disk space.
● To open the display, select Studio > More Options > Max. Record Time.
NOTE
The remaining record time is also shown in the status line above the track list.
If you use individual record folders to store your tracks on different drives, the time display refers to the medium with the least storage space available.
Lock Record
The Lock Record function prevents you from accidentally deactivating record mode.
● Select Edit > Key Commands and in the Transport category, assign key commands to the Lock Record and Unlock Record commands.
If Lock Record is activated and you want to enter stop mode, a dialog opens in which you need to confirm that you want to stop recording. You can also use the Unlock Record key command first and then enter stop mode as usual.
NOTE
An automatic punch out at the right locator position will be ignored in Lock Record mode.
a) Inserting a Retrospective Recording from All MIDI Inputs on the Selected Track:
You can insert a retrospective recording, that is, MIDI data that was sent to All MIDI Inputs in Stop mode or playback, on the selected track.
PREREQUISITE
You have played some MIDI notes in Stop mode or during playback, and you want to recover them.
PROCEDURE
1. Select the MIDI track on which you want to insert the captured MIDI data.
2. Select Transport > MIDI Retrospective Recording > Insert from All MIDI Inputs.
RESULT
The MIDI data that was captured at All MIDI Inputs is inserted on the selected track as one, linear MIDI part.
NOTE
If you insert buffer data from multiple selected tracks, the timing offsets between the data played on the different tracks are retained.
NOTE
If your MIDI track uses MIDI inserts, and Record Output to Track is enabled in the
MIDI Inserts section, the buffer data includes the events that are created by the MIDI inserts.
b) Inserting a Retrospective Track Recording
You can insert a retrospective track recording, that is, MIDI data that was sent to the track input in Stop mode or during playback, on the selected track.
PREREQUISITE
You have played some MIDI notes in Stop mode or during playback, and you want to recover them.
PROCEDURE
1. Select the MIDI track on which you want to insert the captured MIDI data.
2. In the top section of the MIDI track Inspector, click Retrospective Recording.
3. From the pop-up menu, select one of the following:
● To insert the MIDI data as one, continuous MIDI part, select Insert as Linear Recording.
● To insert the MIDI data as stacked MIDI parts, select Insert as Cycle Recording.
NOTE
This is only available if your MIDI data was captured during playback, and cycle mode was active.
RESULT
The MIDI data that was captured at the track input is inserted on the track.
NOTE
If the data was captured during playback, it is inserted at the position where you played it. If the data was captured in Stop mode, it is inserted at the project cursor position.
c) Inserting a Retrospective Track Recording into an Editor
You can insert a retrospective track recording, that is, MIDI data that was sent to the track input in Stop mode or during playback, into the MIDI part that is opened in a MIDI editor.
PREREQUISITE
You have played some MIDI notes in Stop mode or during playback, and you want to recover them.
PROCEDURE
1. Double-click the MIDI part where you want to insert the captured MIDI data to open it in a MIDI editor.
2. On the MIDI editor toolbar, click Insert MIDI Retrospective Recording in Editor.
RESULT
The MIDI data that was captured on the track input is inserted into the MIDI part.
● If the data was captured during playback, it is inserted into the MIDI part along the timeline.
● If the data was captured in Stop mode, it is inserted at the project cursor position.
Important "Audio Record Modes Dialog" is not a Preferences.
● To access the record modes, select Transport > Audio Record Mode.
You can also access the Audio Record Modes by clicking to the right of the audio symbol in the Record Modes section on the Transport panel.
Audio Record Modes Setup Dialog
By selecting an Audio Record Mode, you decide what happens to your recording and to any existing events on the track where you are recording. This is necessary because you will not always record on an empty track. There may be situations where you record over existing events, especially in cycle mode.
● To access the record modes, select Transport > Audio Record Mode.
You can also access the Audio Record Modes by clicking to the right of the audio symbol in the Record Modes section on the Transport panel.
Audio Record Mode
Keep History
Existing events or portions of events that are overlapped by a new recording are kept.
Cycle History + Replace
Existing events or portions of events that are overlapped by a new recording are replaced by the new recording. However, if you record in cycle mode, all takes from the current cycle recording are kept.
Replace
Existing events or portions of events that are overlapped by a new recording are replaced by the last recorded take.
MIDI Cycle Record Mode
When you record MIDI in cycle mode, the result not only depends on the MIDI record mode, but also on the cycle record mode that is selected in the Cycled MIDI Recording Only section.
keywords: Audio setup, wave recording, best take
Important "Common Record Modes Dialog" is not a Preferences.
● To access the record modes, select Transport > Common Record Modes.
You can also access the Common Record Modes by clicking the upper part of the Record Modes section on the Transport panel.
Common Record Modes Setup Dialog
● To access the record modes, select Transport > Common Record Modes.
You can also access the Common Record Modes by clicking the upper part of the Record Modes section on the Transport panel.
Audio Record Mode
Punch In/Out
In this mode, the recording is stopped.
Re-Record
In this mode, the recording is reinitiated, the events are removed, and recording is restarted from the exact same position.
Start Recording at Project Cursor Position
In this mode, recording starts from the cursor position.
Start Recording at Left Locator/Punch In Position
In this mode, recording starts from the left locator.
Re-Recording
If you activate the Re-Record mode, you can reinitiate your recording by hitting the Record button again. Recording will restart from the initial position.
PROCEDURE
1.Select Transport > Common Record Modes, and activate Re-Record.
2.Activate recording.
3.Click Record again to restart recording.
RESULT
The project cursor jumps back to the record start position and recording is reinitiated. Pre-roll and count-in settings are taken into account.
NOTE
The previous recordings are removed from the project and cannot be retrieved using Undo. However, they remain in the Pool. The view the Pool CTRL + P
keywords: record setup, best take

Important "Constrain Delay Compensation" is not a Preferences.
● Constrain Delay Compensation is available on the Project window toolbar and in the Transport zone. You can also find it as a menu item in the MixConsole on the Functions Menu.
Common Record Modes Setup Dialog
● To access the record modes, select Transport > Common Record Modes.
You can also access the Common Record Modes by clicking the upper part of the Record Modes section on the Transport panel.
Common Record Modes
To avoid that Cubase adds latency when you play a VST instrument in real time or record live audio, you can activate Constrain Delay Compensation. This minimizes the latency effects of the delay compensation, while maintaining the sound of the mix as far as possible.
Constrain Delay Compensation is available on the Project window toolbar and in the Transport zone. You can also find it as a menu item in the MixConsole on the Functions Menu.
Activating Constrain Delay Compensation turns off VST plug-ins that are activated for VST instrument channels, audio track channels that are record-enabled, group channels, and output channels. VST plug-ins that are activated for FX channels are disregarded. After recording or using a VST instrument, Constrain Delay Compensation should be deactivated again in order to restore full delay compensation.
keywords: large latency latency problem

File -
New Project... Cmd/Ctrl + N
New Library...
Open... Cmd/Ctrl + O
Open Library...
Close Cmd/Ctrl + W
---------------
Save Cmd/Ctrl + S
Save As … Cmd/Ctrl + Shift + S
Save New Version Cmd/Ctrl + Alt + S
Revert
---------------
Page Setup...
Print...
---------------
Import >
Export >
Back up Project
Save as Templates...
Save Libary
---------------
Recent Projects
Quit Cmd/Ctrl + Q
keywords:
Import tracks from other project: File - Import - Track from Project...
Mixdown File - Export - Audio - Mixdown E (My customized)
Export - Video...
Create template File - Save as Templates
.jpg?etag=%2214fb0-601eb436%22&sourceContentType=image%2Fjpeg&ignoreAspectRatio&resize=576%2B427&quality=85)
Import > Audio File, Track Archive, Track from Project, Audio CD, Video File, Audio from Video, File OMF, AAF, MIDI File, MusicXML, Tempo Track
Export > Audio Mixdown, SelectedTracks, Video, OMF, AAF, MIDI File, MIDI Loop, MusicXML, Scores, Tempo Track, NotePad Data
keywords: make wave file, make MP3 file, Make video, render video
Edit -
Undo Set Track Name
Redo
History...
---------------
Cut
Copy
Paste
Delete
Functions >
Render in Place >
Range >
---------------
Select >
---------------
Quantize Q
Reset Quantize
Quantize Panel
Advance Quantize >
---------------
Move to >
Group Cmd/Ctrl + G
Ungroup Cmd/Ctrl + U
Lock... Cmd/Ctrl + Shift + L
Unlock... Cmd/Ctrl +Shift + U
Mute... Cmd/Ctrl + M
Ummute Cmd/Ctrl + U
Glue
---------------
Automation Follows Events
Auto Select Event under Cursor
Enlarge Selcted Track
---------------
Zoom >
---------------
Macros >
---------------
Profile Manger...
Key Coammands...
Preferences... Link to Preferences INDEX
keywords:
Z.jpg?etag=%22176e3-601eb506%22&sourceContentType=image%2Fjpeg&ignoreAspectRatio&resize=596%2B612&quality=85)
Project -
Add Track >
---------------
Colorize Selcted Tracks...
---------------
Duplicate Tracks
Remove Slected Track
Remove Empty Tracks
---------------
Divide Track List
Track Folding >
Track Version >
---------------
Convert Track >
Head Tracking
GoPro VR Player Remote
---------------
Pool
Makers
Tempo Track
Browser
Automation Panel
Beat Calculator...
Tempo Detection...
Notepad
Project Logical Editor
Apply Project Logical Editor Preset >
--------------
Chord Pads >
Chord Track >
Signature Track >
---------------
Set Timecode at Cursor...
Auto Fades Settings
---------------
Project Colors Setup...
Project Setup...
---------------
Keywords:
MIDI to Chord track: Project - Chord Track - Create Chord Symbols
Z.jpg?etag=%221834f-601eb6a2%22&sourceContentType=image%2Fjpeg&ignoreAspectRatio&resize=573%2B545&quality=85)
Add track > Audio, Instrument, MIDI, Sampler, Effect, Group, VCA, Group Channel to Selected Channels, FX to Selected Channels, VCA to Selected Channels, Folder, Marker, Ruler, Using Track Presets, Arranger, Chord, Signature, Temp, Transponse, Video
Track Folding > Toggle Selcted Track, Fold Tracks, Flip Fold States, Move Selected Tracks to New Folder, Show All Used Automation, Hide All Automation
Track Version > New Version. Duplicate Version, Rename Version, Previous Version, Create Lanes from Versions, Create Versions from Lanes, Select Track with same Version ID, Assign Common Versions ID, Delete Inactive Versions of Selcted Tracks, Delete Inactive Versions of Selected Tracks, Delete Inactive Versions of Selcted Tracks
Convert Track > Multi-Channel to Mono, Mono to Multi-channel
Apply Project Logical Editor Preset > Examples, Naming, Parts + Events, Tracks, Visibility, Init
Chord Pads > Show/Hide Chord Pads, Chord Pads Setup
Chord Track > Create Chord Symbols, Assign Voices to Notes, Map to Chord Track, Chords to MIDI, Set up Musical Scales
Signature Track > Copy Click Pattern to Clipboard, Paste Click Pattern to Selected Signatures, Apply Click Pattern to Equal Signatures, Reset Click Pattern to Default, Show Click Patterns, Render MIDI Click between Locators, Render Audio Click between Locators, Process Bars Dialog
keywords: add chord track, VST,
Convert Track > Mulit track is an example of stereo track
stereo track connvert stereo track to mono track, convert mono track to stereo track ( multi stereo mono)
Add beats into middle of a project, add bars into middle to a project, delete beat in a project delelte beat in a project
Use Signature track and click on the arrow and choose Process Bars Dialog ---> add or delete bars.
Audio -
Open Sample Editor
Open Audio Part Editor
Set up Editor Preferences
---------------
Direct offline Processing F7
Plug-ins >
Processes >
Make Direct Offline Processing Permanent
Extension >
---------------
Spectrum Analyser
Statistics Alt/Cmd A (My customized)
Hitpoints >
Relatime Processing >
Advanced >
Evnts to Part
Dissolve Part
Snap Point to Cursor
Bounce Selections
Find Selected in Pool
Update Origin
---------------
Generate Harmony Voices...
Open Audio Alignment Panel
---------------
Crossfade (X)
Remove Fades
Open Fades Editor(s)
Adjust Fades to Range
Fade In to Cursor
Fade Out to Cursor
Remove Volume Curve
Invert Phase ON/Off
Fade Out to Curve
---------------
Create Sample Track
keywords:
Offline processing Audio - Direct - Offline - Processing (F7)
Generate harmonies Audio - Generate Harmony Voices...
Z.jpg?etag=%22177da-601eb6c9%22&sourceContentType=image%2Fjpeg&ignoreAspectRatio&resize=573%2B568&quality=85)
Plug-ins > Deafult
Processes > Evnelope, Fade In , Fade Out, Gain, Invert Phase, Normalize, Pitch Shift, Remove DC Offset, Resample, Reverse, Silence, Stereo Flip, Time stretch
Make Direct Offline Processing Permanent
Extension > SpectraLayers, Melodyne, Remove Extion from Selected events
Hitpoints > Calculate Hitpoints, Create Audio Slices from Hitpoints, Create Markers from Hitpoints, Divide Audio Events at Hitpoints, Remove Hitpoints
Relatime Processing > Create Warp Makers from Hitpoints, Flatten Realtime Processing, Unstretch Audio
Advanced > Detect Silence, Event or Range as Region, Event from Regions, Set Tempo from Event, Set Definition from Tempo, Close Gaps (Time Stretch), Close Gaps (Crossfade), Stretch to Project Tempo, Delete Overlaps
keywords:
Processes > Remove DC BIAS , Reverse a section, Reverse a events, add Silence
MIDI -
Open Key Editor
Open Score Editor
Open Drum Editor
Open List Editor
Open In Place Editor
Setup Editor Preferences
---------------
Transponse Setup
Mege MIDI in Loop...
Freeze MIDI Modifers
Dissolve Part
Bounce MIDI
O-Note Conversion
Reapet Lopp
Functions... >
---------------
Logical Editor...
Logical Presets >
Drum Map Setup...
Insert Velocities...
CC Automation Setup...
---------------
Note Expression >
Expression Map Setup...
Reset
keywords:
Z.jpg?etag=%2216c11-601eb6e5%22&sourceContentType=image%2Fjpeg&ignoreAspectRatio&resize=636%2B520&quality=85)
Function > Legato, Fixed Lenghts, Pedals to Note Lenght, Delete Overlaps (mono), Delete Overlaps (poly), Velocity, Fixed Velocity, Delete Doubles, Deltet Notes, Delete Controllers, Deltete Continuous Controllers, Restrict Polyphony, Thin Out Data, Extract MIDI Audomation, Reverse, Mirror, Merge Temp from Tapping,
Logical Presets > Added for Version 3, Musical Context, Note Expression, standard set 1, standard set 2, init,
Logical Editor functions:
Added for Version3 Cubase (will soon be added)
Musical Context (will soon be added)
Note Expression (will soon be added)
Experimental (will soon be added)
Standard set 1 (will soon be added)
Standard set 2 (will soon be added)
init
Note Expresion> Open Note Expression Editor, Convert to Note Expression, Consolidate Note Expression Overlaps, Distribute Note to MIDI channels, Dissolve Note Expression, Remove Note Expression, Trim Note Expression to Note Lenght, Note Expression MIDI Setup
keywords:
Scores -
Open Score Editor Ctrl + R
Open Layout...
---------------
Page Mode
---------------
Settings
---------------
Group / Ungroup Notes
Cinvert to Grace Note
Build N-Tuplet...
Insert Slur
Hide / Show
Flip
---------------
Aligt Elements >
---------------
Make Chord Symbols
---------------
Funtions >
Rhythm Notation >
--------------
Auto Layout...
Reset Layout...
Advance Layout >
keywords:
Z.jpg?etag=%221606f-601eb707%22&sourceContentType=image%2Fjpeg&ignoreAspectRatio&resize=582%2B436&quality=85)
Media -
Open Poole Window Ctrl + P
---------------
MediaBay (F5)
Loop Browser
Sound Browser
---------------
Import Medium...
Import Audio CD...
Import Pool...
Export Pool...
--------------
Show in Exploer
Find Missing Files...
Remove Missings Files
Reconstruct
Convert Files...
Write Attribute to File
Extract Audio from Video file
Generate Thumbnail Cache
---------------
Create Folder
Empty Trash
Remove Unused Media
Prepare Archive...
Set Poll Record Folder
---------------
Minimize File
New Version
Crate Sample Track
Insert into Project >
Select in Project
keywords:
Z.jpg?etag=%2218aef-601eb721%22&sourceContentType=image%2Fjpeg&ignoreAspectRatio&resize=582%2B500&quality=85)
Transport -
Transport Panel F2
---------------
Transport Commands >
Locators >
Punch Points >
Set Project Cursor Posistion >
Play Project Range >
Pre-roll & Post-roll >
---------------
Use Tempo Track T
--------------
Common Records Modes >
Audio Record Mode: <Keep History> >
MIDI Record Mode: <New Parts> >
MIDI Cycle Record Mode <Mix> >
MIDI Retrospective Recording >
---------------
Use Video Follows Edit Mode
---------------
Metronome Setup...
Activate Mentronome
---------------
Project Synchronization Setup...
Activate External Sync Alt/Cmd + Shift + T
keywords:
cursor follow edit in keyeditor Transport - Use Video Follows Edit Mode
Z.jpg?etag=%22185f5-601eb73b%22&sourceContentType=image%2Fjpeg&ignoreAspectRatio&resize=582%2B437&quality=85)
Studio -
Audio Connections... F4
---------------
MixConsole F3
MixConsole 2
MixConsole 3
MixConsole in Project Window Alt/Cmd + F3
Control Room
---------------
VST Plug-in Manager
VST Instruments F11
Audio Performance... F12
Video Player F8
On Screen Keyboard... Alt/Cmd +K
---------------
More Options
--------------
ReWire >
---------------
Studio Setup...
keywords:
Keyboard Studio - On Screen Keyboard (Alt/Cmd K)
Plugin Manager Studio - VST Plug-in Manger
Z.jpg?etag=%22182a8-601eb76b%22&sourceContentType=image%2Fjpeg&ignoreAspectRatio&resize=582%2B436&quality=85)
Workspaces -
No Workspace Alt/Cmd+Num 0)
Update Workspace Alt/Cmd + U)
Add Workspace Ctrl + Num 0)
Organize...
---------------
Here show up users list of saved workspace!
...
...
...
keywords:
Z.jpg?etag=%22e587-601eb79c%22&sourceContentType=image%2Fjpeg&ignoreAspectRatio&resize=573%2B237&quality=85)
Window
Minimize
Mazimize
---------------
Close All
Minimazie All
Restore All
---------------
Hide Plug-in Window
Select Next Plug-in Window
Close All Plug-in Window
---------------
Show Cubase Pro Desktop
--------------
Windows...
---------------
Here show users active window!
keywords:
Z.jpg?etag=%22fb98-601eb7b1%22&sourceContentType=image%2Fjpeg&ignoreAspectRatio&resize=584%2B215&quality=85)
VST Cloud
VST Connect SE >
VST Transit
keywords:
Z.jpg?etag=%22f328-601eb7c5%22&sourceContentType=image%2Fjpeg&ignoreAspectRatio&resize=582%2B261&quality=85)
HUB -
Open Hub
---------------
Register Now...
---------------
Community >
Support >
---------------
Software Trials
---------------
Hardware for Cubase >
Apps for Cubase >
keywords:
Z.jpg?etag=%22129eb-601eb7db%22&sourceContentType=image%2Fjpeg&ignoreAspectRatio&resize=582%2B250&quality=85)
Help -
Cubase Help
---------------
Credits and Copyrigths >
About Cubase
keywords:
Show version Help - About Cubase
Z.jpg?etag=%22f8ae-601eb7f2%22&sourceContentType=image%2Fjpeg&ignoreAspectRatio&resize=582%2B190&quality=85)